Hi there, while thinking of ORM (Object Relational Mapping)
I got eager to check what kind of integrations we can have using multiple ORM’s
with deferent Dependency Injection mechanism. This is the first article in the
series “Integrating MVC 5 with Dapper as ORM and Unity as the Dependency
Injection technique”
Tools used in this article: Visual Studio 2017 and SQL Local
DB (2014). Source code for this tutorial can be find at : https://github.com/buddike1112/DIIntegration
Let’s start:
1. Open Visual Studio 2017 Community Edition and
select .NET framework as “4.7” and select blank solution template. Then give
the name as “VehiclePortal”. Click “OK”.

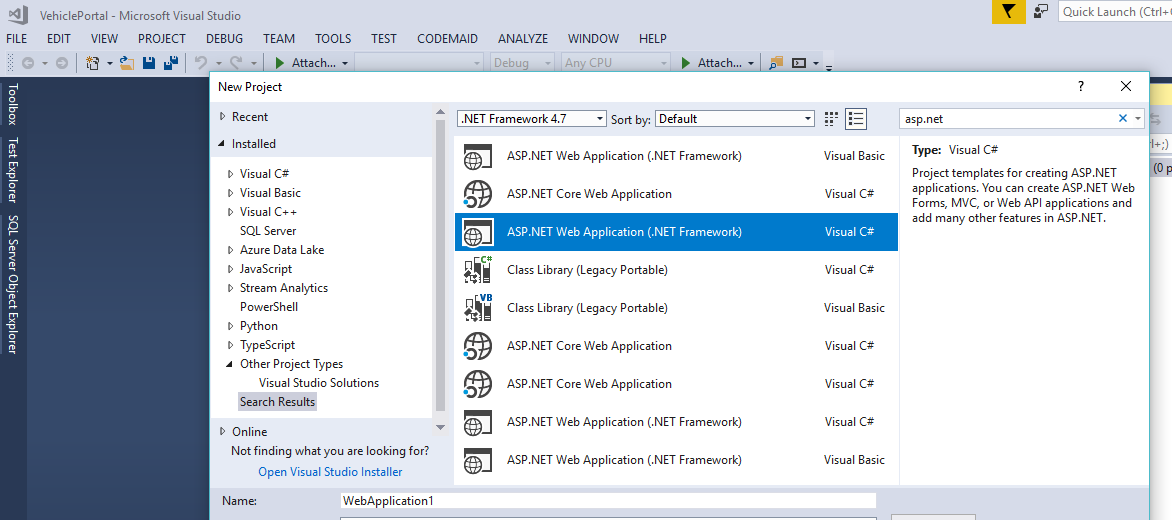
2.
Let’s create MVC 5 empty project. In Visual
Studio, Click File -> New -> Project, then type asp.net in search box. Select
highlighted item in below screenshot. Enter “Name” as “VehicleManager”, select
“Solution” as “Add to Solution” (so new project will be added to the solution)
3.
Click “Empty” and “MVC” check boxes. Don’t worry
about Unit tests at the moment, I’m planning to do separate article for TDD (Test
driven development) as well as BDD (Behavior driven development)
MVC 5 project will get created.
4.
Let’s install required Nuget Packages for our
lab. Right click on the new project we created and select “Manage Nuget
Packages…”

5.
Let’s install our IoC container to address
Dependency Injection. Type “Unity” in the search box and install package
“Unity.Mvc”. This action will install 3 packages, “Unity.Mvc”, “Unity.Container”
and “Unity.Abstractions”

6.
Let’s install Dapper, to work as our ORM (Note:
Dapper is a Micro-ORM (Object Relational Mapping) and is good for database
queries other than Full ORM. Read more from here : http://gunnarpeipman.com/2017/05/micro-orm/)

Note: UnityConfig.cs and
UnityMvcActivator.cs files. These will be used for our future implementation
7.
Now it’s time to create our simple database.
Let’s name it as “VehicleDB”. Create the DB project from File -> New ->
Project -> Search SQL project template.

8. Create db schema folder called “dbo” under our
“VehicleDB” project, so all our stored procedures, table definitions can stay
there.
9. Create “Makes”, “VehicleTypes”, “Models” and
“Vehicles” tables using below sql scripts
Creating “Makes” table
Notes: Our primary key is auto populating Identity field
CREATE TABLE [dbo].[Makes]
(
[MakeId] INT IDENTITY(1,1) NOT NULL PRIMARY KEY,
[Name] VARCHAR(200) NULL
)
Creating “VehicleTypes” table
CREATE TABLE [dbo].[VehicleTypes]
(
[VehicleTypeId] INT IDENTITY(1,1) NOT NULL PRIMARY KEY,
[Name] VARCHAR(100) NULL
)
Creating “Models” table
CREATE TABLE [dbo].[Models]
(
[ModelId] INT IDENTITY(1,1) NOT NULL PRIMARY KEY,
[ModelName] VARCHAR(50) NULL,
[EngineSize] VARCHAR(50) NULL,
[NumberOfDoors] INT NULL,
[Colour] VARCHAR(50) NULL,
[VehicleTypeId] INT NOT NULL,
CONSTRAINT FK_VehicleTypeId FOREIGN KEY (VehicleTypeId) REFERENCES VehicleTypes
(VehicleTypeId)
)
Creating “Vehicles” table
CREATE TABLE [dbo].[Vehicles]
(
[VehicleId] INT IDENTITY(1,1) NOT NULL PRIMARY KEY,
[MakeId] INT NULL,
[ModelId] INT NULL,
[Year] INT NULL,
[Price] DECIMAL NULL,
[SoldDate] DATE NULL,
CONSTRAINT FK_MakeId FOREIGN KEY (MakeId) REFERENCES Makes (MakeId),
CONSTRAINT FK_ModelId FOREIGN KEY (ModelId) REFERENCES Models (ModelId)
)
Notes: You can add xml comments to each
table definition, so table’s purpose will be more visible. Hope you noted,
Models table have foreign key reference from VehicleTypes table. Also Vehicles
table is consist of few foreign key references from Models and Makes tables
10.
Now let’s create seed test data scripts, so we
don’t need to worry about CRUD actions, since our primary target is to study
dependency injection and ORM integration. We are going to add
PreDeploymentSeedData and PostDeploymentSeedData. Select DB project -> Right
click -> Add -> Select “Script”
-> Select PostDeployment script and name as “Script.PostDeployment”. Then paste
below script code over there, so we have some dummy content.
USE VehicleDB
GO
INSERT INTO [dbo].[Makes]
VALUES('TOYOTA')
INSERT INTO [dbo].[Makes]
VALUES('NISSAN')
GO
INSERT INTO [dbo].[VehicleTypes]
VALUES('SEDAN')
INSERT INTO [dbo].[VehicleTypes]
VALUES('SUV')
INSERT INTO [dbo].[VehicleTypes]
VALUES('HATCHBACK')
GO
INSERT INTO [dbo].[Models]
VALUES('COROLLA', '1800', 5, 'WHITE', 1)
INSERT INTO [dbo].[Models]
VALUES('XTRAIL', '2400', 5, 'BLACK', 2)
INSERT INTO [dbo].[Models]
VALUES('VITZ', '1500', 5, 'RED', 3)
GO
INSERT INTO [dbo].[Vehicles]
VALUES(1, 1, 2013, 5000.00, NULL)
INSERT INTO [dbo].[Vehicles]
VALUES(1, 3, 2014, 8000.00, '2018-01-01')
INSERT INTO [dbo].[Vehicles]
VALUES(1, 3, 2011, 4000.00, NULL)
GO
11.
Now we can create some stored procedures to
retrieve data. My main target is to List all vehicles. So we may need to
resolve multiple dependencies from VehicleTypes, Models, Makes which were
directly affecting list view.
12. Create new stored procedure called “usp_GetVehicles.sql”
inside a folder called “StoredProcedures”, as for the best practice include
verb and the type of the data set returning from the stored procedure. For the
user defined stored procedures, we use “usp_”. Paste below sql code block into the
newly created stored procedure.
/*
Author : XXXXXXX
Description : Listing all the unsold vehicles
Parameters :
Example execution :
exec usp_GetVehicles
*/
CREATE PROCEDURE [dbo].[usp_GetVehicles]
AS
BEGIN
SET NOCOUNT ON;
SET TRANSACTION ISOLATION LEVEL READ UNCOMMITTED;
SELECT MAKE.[Name] AS Make, MODEL.[ModelName] AS Model, V.[Year], V.[Price]
FROM [dbo].[Vehicles] V
INNER JOIN [dbo].[Makes] MAKE
ON MAKE.[MakeId] = V.[MakeId]
INNER JOIN [dbo].[Models] MODEL
ON MODEL.[ModelId] = V.[ModelId]
WHERE V.[SoldDate] IS NULL
ORDER BY V.[Price] DESC
END
Notes: As you can see,
I’m using few SQL terms as well as documentation in stored procedure. You are
free to follow the documentation practice above, I bet it will appreciate by
your code reviewer J.
NOCOUNT ON – We don’t
want to return the count of records, so stored proc performing well
TRANSACTION ISOLATION
LEVEL READ UNCOMMITTED – We are performing dirty reads. Please research about
this, refer this link
After you have completed
above tasks in SQL project, your project structure should be like below:

13. Now we
have database completed and we need to build connectivity with our MVC project.
I’m planning to create Database Manager who is responsible to manage SQL DB
connections and maintain single collection, so we will apply singleton pattern
to the Database Manager. Whenever repository member need a connection, Database
Manager will provide on the go.
14. Let’s
create a folder called “Data” in the MVC project. Then add folder called
“Interfaces”, after that add “public” interface called “IDatabaseManager”.
Finally create inherited class call “DatabaseManager” inside “Data” folder.
After completing the tasks, it may look like below:

In “IDatabaseManager” interface add below method
definition, so we can implement the method in derived class “DatabaseManager”
IDbConnection GetSqlConnection();
In “DatabaseManager” add below implementation
public IDbConnection GetSqlConnection()
{
IDbConnection connection = new SqlConnection(this.connectionString);
connection.Open();
return connection;
}
As you can see, I’m getting “connectionString parameter”
from a property. So let’s store our database connection string in Web.config
Add below section just after <appsettings> section
<connectionStrings>
<add name="VehiclePortalDBConnection" providerName="System.Data.SqlClient" connectionString="Server=(localdb)\MSSQLLocalDB;Database=VehicleDB;Trusted_Connection=True;MultipleActiveResultSets=True" />
</connectionStrings>
Let’s create a read-only property to store our database
connection string. Final implementation for our “DatabaseManager” is like
below:
using System.Configuration;
using System.Data;
using System.Data.SqlClient;
namespace VehicleManager.Data
{
public class DatabaseManager : IDatabaseManager
{
private readonly string
connectionString;
public DatabaseManager()
{
this.connectionString = ConfigurationManager.ConnectionStrings["VehiclePortalDBConnection"].ConnectionString;
}
public IDbConnection GetSqlConnection()
{
IDbConnection connection = new SqlConnection(this.connectionString);
connection.Open();
return connection;
}
}
}
Notes: You can use
GhostDoc to create documentation for the members and it’s so easy.
15. Now we got
our own “DatabaseManager” to handle connections. It’s time to create our
repository calls. Let’s create another “public” interface inside “Interfaces”
folder, called “IVehicleRepository” so Repository can inherit. Then create
repository class called “VehicleRepository”. After successful creation, they
stays like below:

Let’s create our Database calls in Repository methods. Add
below method definition to the “IVehicleRepository” interface.
public interface IDatabaseRepository
{
IEnumerable<VehicleDto> GetVehicles();
}
Then add method
implementation in repository class. Copy and paste below code
public class VehicleRepository : IVehicleRepository
{
public IDatabaseManager Manager { get; set; }
public VehicleRepository(IDatabaseManager manager)
{
if (Manager == null)
{
Manager = manager;
}
}
public IEnumerable<VehicleDto> GetVehicles()
{
using (IDbConnection conn = Manager.GetSqlConnection())
{
try
{
return conn.Query<VehicleDto>("usp_GetVehicles", commandType: CommandType.StoredProcedure);
}
catch (SqlException ex)
{
Console.WriteLine("Exception occurred",
ex.Message);
return null;
}
}
}
}
Notes: Above “GetVehicles”
method we are applying “using” block with connection we acquired from the “DatabaseManager”
instance, so instance will automatically under garbage collection. Once it’s
done with its purpose, GC will perform it’s part. Notice we used “Dapper”
extension method to query and convert it to our DTO (Data Transfer Object). Let’s
create a folder under “Data” called “Dto” and create a class called “VehicleDto”
and copy / paste below code:
public class VehicleDto
{
public string Make { get; set; }
public string Model { get; set; }
public int Year { get; set; }
public double Price { get; set; }
}
Notes: Make sure your
Dto reflect your view requirements, otherwise we may end up with double work in
scaffolding step. Also please resolve VehicleDto object in IVehicleRepository
and VehicleRepository
16. Let’s add
the “VehiclesController” under “Controllers” folder in MVC project. Copy and
paste below code inside “VehiclesController”
public IVehicleRepository vehiclesRepo { get; set; }
public VehiclesController(IVehicleRepository repository)
{
vehiclesRepo = repository ?? throw new ArgumentNullException("Repository is null");
}
public ActionResult Index()
{
try
{
IEnumerable<VehicleDto> list = vehiclesRepo.GetVehicles();
return View(list);
}
catch (Exception ex)
{
Console.WriteLine($"Exception occurred : {ex.Message}");
return null;
}
}
17. Let’s
create Vehicles Index view from the controller. Double click the index Action,
right click and select “Add View”. Then fill the form like below

Click “Add” (scaffolding)
18. Go to
App_Start folder and open “RouteConfig” file and update default settings with
below:
public class RouteConfig
{
public static void RegisterRoutes(RouteCollection routes)
{
routes.IgnoreRoute("{resource}.axd/{*pathInfo}");
//enable
attribute routing
routes.MapMvcAttributeRoutes();
//convention-based
routes
routes.MapRoute(
name: "Default",
url: "{controller}/{action}/{id}",
defaults: new { controller = "Vehicles", action = "Index", id = UrlParameter.Optional }
);
}
}
Since our project is not large, we just update default
controller to “Vehicles”.
19. Open “UnityConfig.cs”
file and copy and paste below code in “RegisterTypes” method:
container.RegisterSingleton<IDatabaseManager, DatabaseManager>();
container.RegisterType<IVehicleRepository, VehicleRepository>();
Notes: Here we are registering our Database manager and
repository. You need to register each type in here to resolve all the
dependency injection issues. Better to follow design patterns as much as
possible.
20. Let’s
deploy our database to the sql instance. Open command prompt. Create sql
instance called “MSSQLLocalDB” if it’s not available. Then publish
our database project. If you completed all the tasks, database will get published
without any issue and post deployment script will run and populate data to the
table. Notes: Check SQL project properties “Target Platform”, this should be
SQL Server 2014.
21. If you
completed all the tasks MVC view should list down all the “Unsold” vehicles in
Vehicle table like below:


Cool! That’s it.